官方文档: https://kubernetes.io/
kuboard官网: https://kuboard.cn/
traefik: https://doc.traefik.io/traefik/
Istio: https://istio.io/latest/zh/docs/setup/getting-started/
helm3: https://helm.sh/zh/docs/ https://www.bilibili.com/video/BV12D4y1Y7Z7/?p=5&vd_source=9cc13448e910ab1ffd162e81e473a56e
清理之前安装的k8s 1 2 3 4 5 6 7 8 9 10 11 12 13 14 15 16 17 18 19 20 21 22 23 24 25 26 27 28 29 30 31 32 33 34 35 36 37 38 39 40 41 42 43 44 45 46 47 48 49 50 51 52 53 kubeadm reset -f modprobe -r ipip lsmod rm -rf ~/.kube/rm -rf /etc/kubernetes/rm -rf /etc/systemd/system/kubelet.service.drm -rf /etc/systemd/system/kubelet.servicerm -rf /usr/bin/kube*rm -rf /etc/cnirm -rf /opt/cnirm -rf /var/lib/etcdrm -rf /var/etcdyum clean all yum remove kube* iptables -t nat -F iptables -t nat -X iptables -t nat -P PREROUTING ACCEPT iptables -t nat -P POSTROUTING ACCEPT iptables -t nat -P OUTPUT ACCEPT iptables -t mangle -F iptables -t mangle -X iptables -t mangle -P PREROUTING ACCEPT iptables -t mangle -P INPUT ACCEPT iptables -t mangle -P FORWARD ACCEPT iptables -t mangle -P OUTPUT ACCEPT iptables -t mangle -P POSTROUTING ACCEPT iptables -F iptables -X iptables -P FORWARD ACCEPT iptables -P INPUT ACCEPT iptables -P OUTPUT ACCEPT iptables -t raw -F iptables -t raw -X iptables -t raw -P PREROUTING ACCEPT iptables -t raw -P OUTPUT ACCEPT 卸载flannel网络步骤: kubectl delete -f https://raw.githubusercontent.com/coreos/flannel/master/Documentation/kube-flannel.yml ifconfig cni0 down ip link delete cni0 ifconfig flannel.1 down ip link delete flannel.1 rm -rf /var/lib/cni/rm -f /etc/cni/net.d/*注:执行完上面的操作,重启kubelet
安装篇
按照以下文档安装的集群,一般都没啥问题
二进制方式安装
Kubdeadm方式安装
1 2 3 4 5 6 7 8 9 10 11 12 13 14 15 16 17 18 19 20 21 22 23 24 25 26 27 28 29 30 31 32 33 34 35 swapoff -a && sed -i '/swap/s/^/#/' /etc/fstab setenforce 0; sed -ri '/^SELINUX=/s/SELINUX=.+/SELINUX=disabled/' /etc/selinux/config modprobe br_netfilter echo -e 'net.bridge.bridge-nf-call-ip6tables = 1\nnet.bridge.bridge-nf-call-iptables = 1' > /etc/sysctl.d/k8s.conf && sysctl --systemgrep -e ipvs -e nf_conntrack_ipv4 /lib/modules/$(uname -r)/modules.builtin modprobe -- ip_vs;modprobe -- ip_vs_rr;modprobe -- ip_vs_wrr;modprobe -- ip_vs_sh;modprobe -- nf_conntrack_ipv4 && cut -f1 -d ' ' /proc/modules | grep -e ip_vs -e nf_conntrack_ipv4 yum install -y ipset ipvsadm yum install -y containerd.io-1.3.9 docker-ce-19.03.14 docker-ce-cli-19.03.14 [Service] ExecStartPre=-/sbin/modprobe overlay ExecStartPre=-/sbin/modprobe ip_vs ExecStartPre=-/sbin/modprobe ip_vs_rr ExecStartPre=-/sbin/modprobe ip_vs_wrr ExecStartPre=-/sbin/modprobe ip_vs_sh ExecStartPre=-/sbin/modprobe nf_conntrack_ipv4 ExecStart=/usr/bin/containerd kubeadm init --control-plane-endpoint "192.168.50.116:6443" --pod-network-cidr 172.16.0.0/16 --service-cidr 10.96.0.0/16 --image-repository registry.aliyuncs.com/google_containers --upload-cert scp -r /etc/kubernetes/pki/* 192.168.50.112:/etc/kubernetes/pki rm /etc/kubernetes/pki/{apiserver.crt,apiserver.key,apiserver-etcd-client.crt,apiserver-etcd-client.key,apiserver-kubelet-client.crt,apiserver-kubelet-client.key,etcd/peer.crt,etcd/peer.key,etcd/server.crt,etcd/server.key}
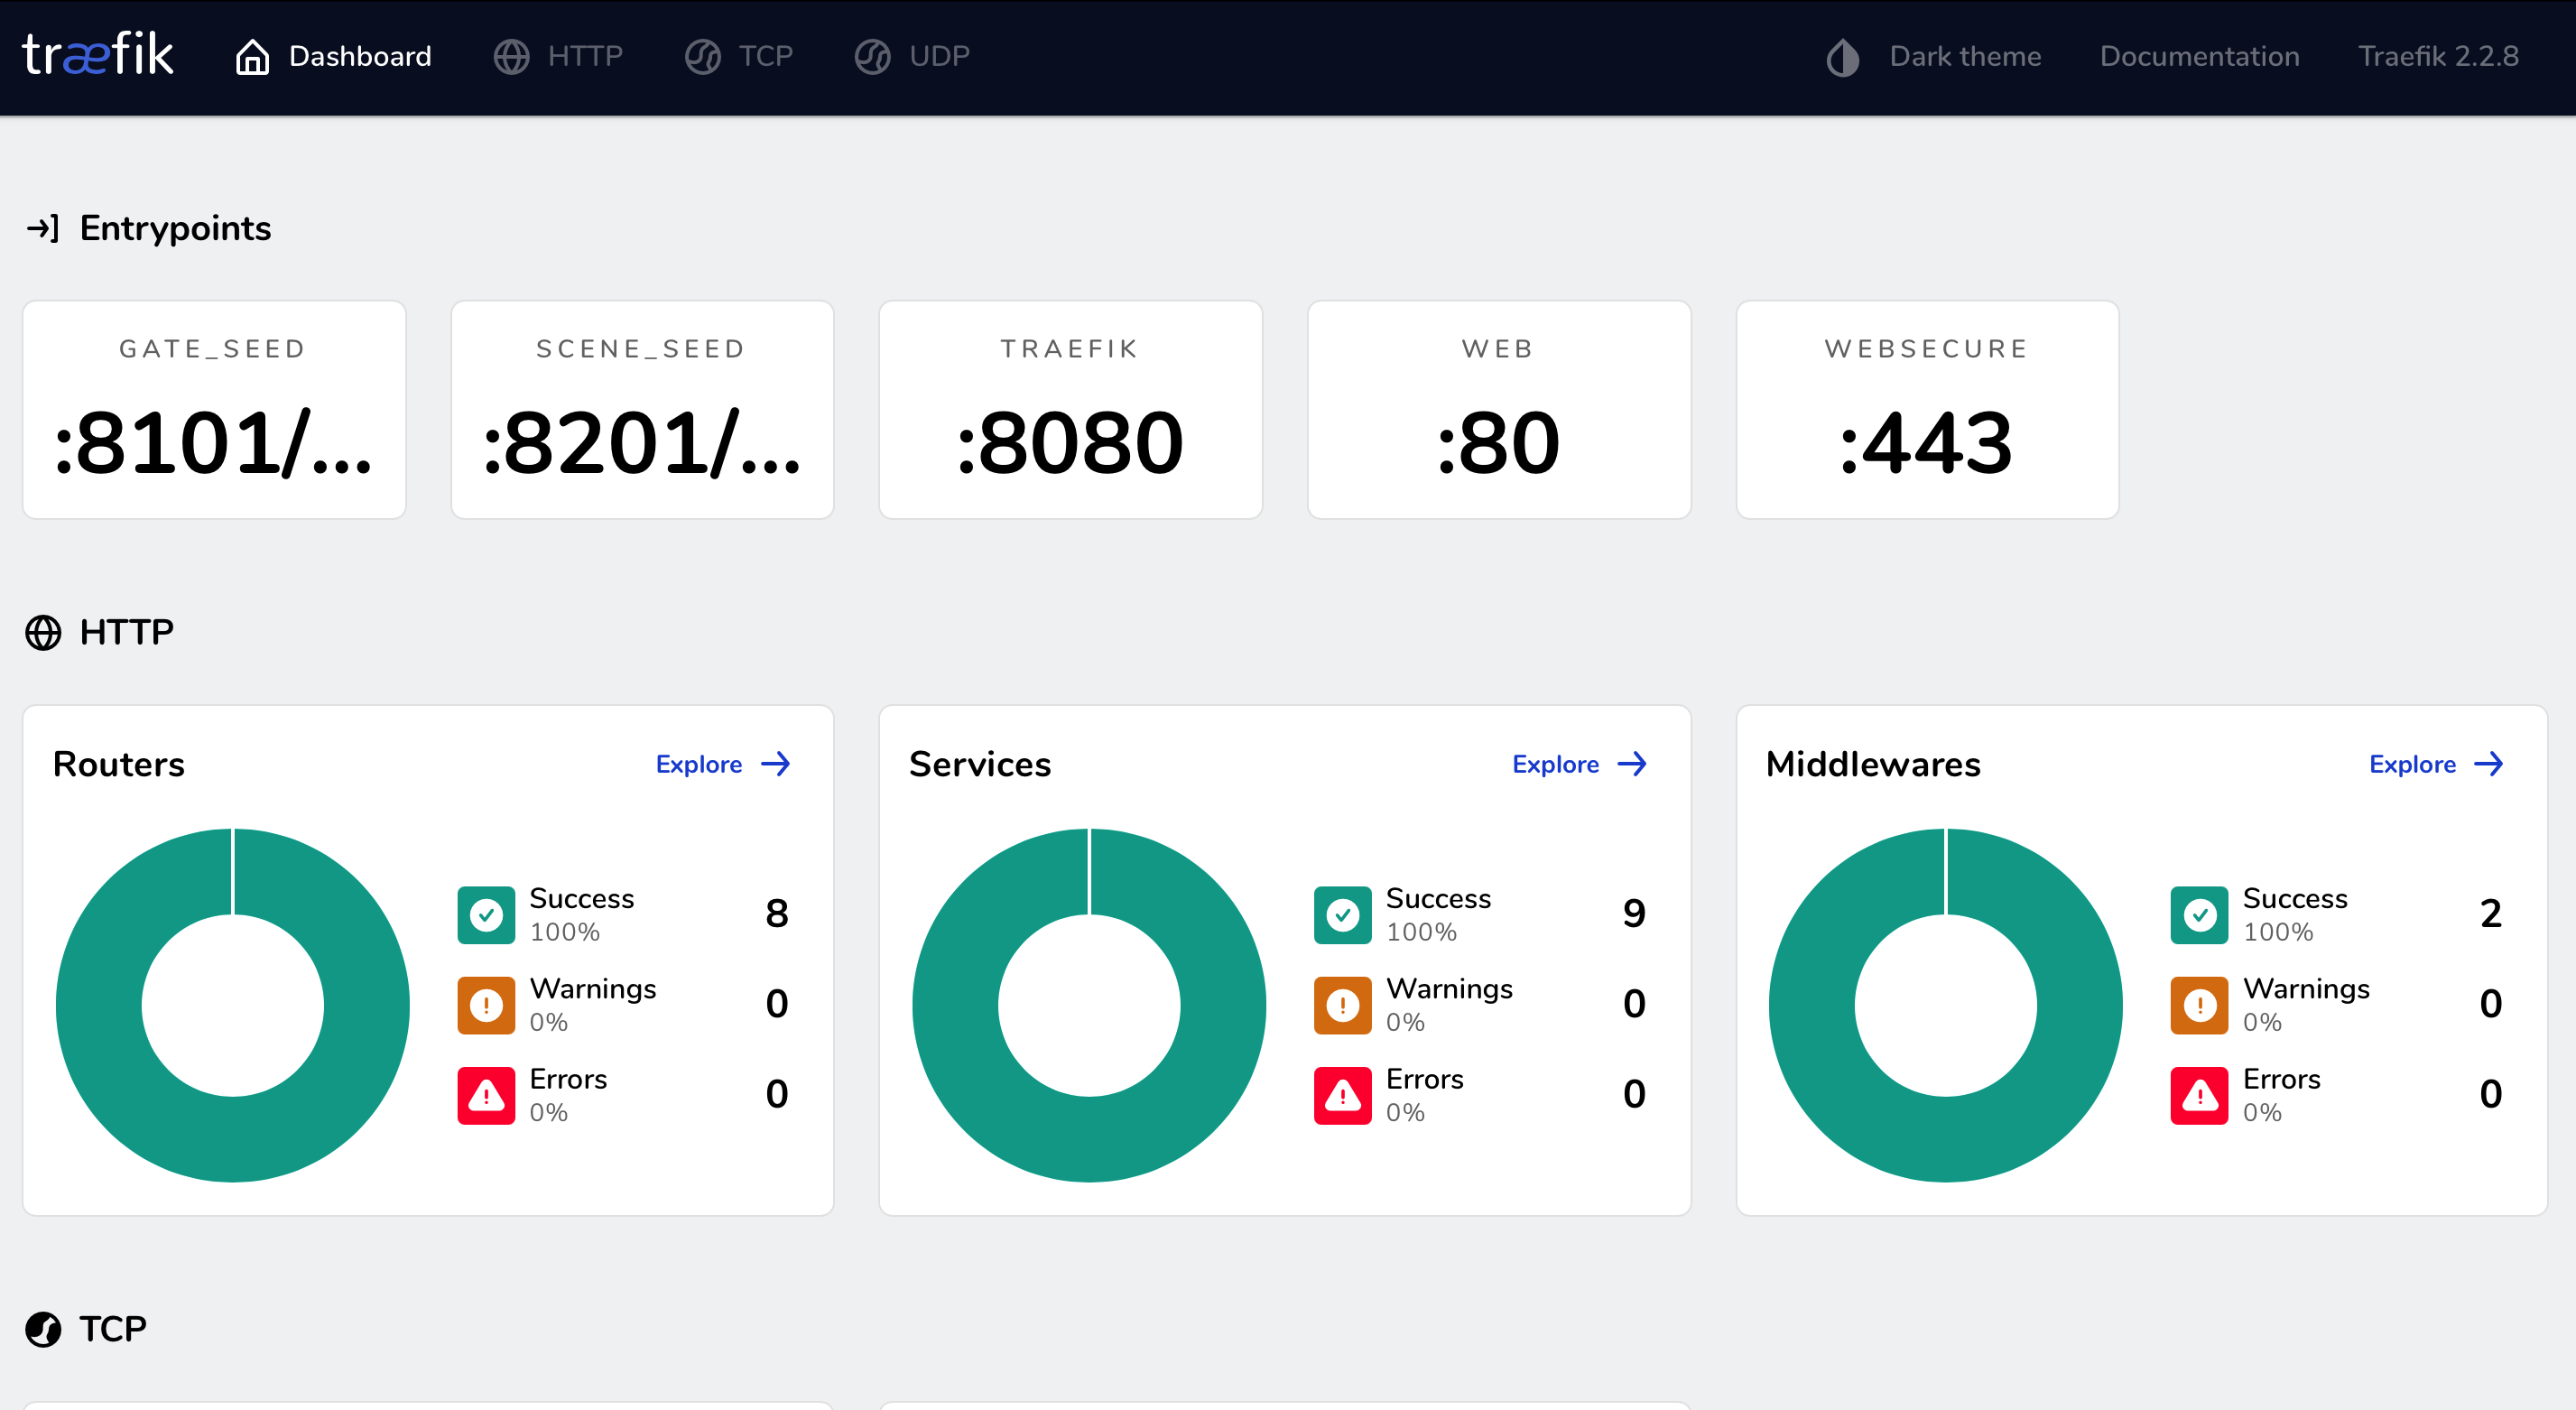
TRAEFIK 篇 traefik官方文档
一文搞懂 Traefik2.1 的使用
traefik2.2.yaml
1 2 3 4 5 6 7 8 9 10 11 12 13 14 15 16 17 18 19 20 21 22 23 24 25 26 27 28 29 30 31 32 33 34 35 36 37 38 39 40 41 42 43 44 45 46 47 48 49 50 51 52 53 54 55 56 57 58 59 60 61 62 63 64 65 66 67 68 69 70 71 72 73 74 75 76 77 78 79 80 81 82 83 84 85 86 87 88 89 90 91 92 93 94 95 96 97 98 99 100 101 102 103 104 105 106 107 108 109 110 111 112 113 114 115 116 117 118 119 120 121 122 123 124 125 126 127 128 129 130 131 132 133 134 135 136 137 138 139 140 141 142 143 144 145 146 147 148 149 150 151 152 153 154 155 156 157 158 159 160 161 162 163 164 165 166 167 168 169 170 171 172 173 174 175 176 177 178 179 180 181 182 183 184 185 186 187 188 189 190 191 192 193 194 195 196 197 198 199 200 201 202 203 204 205 206 207 208 209 210 211 212 213 214 215 216 217 218 219 220 221 222 223 224 225 226 227 228 229 230 231 232 233 234 235 236 237 238 239 240 241 242 243 244 245 246 247 248 249 250 251 252 253 254 255 256 257 258 259 260 261 262 263 264 265 266 267 268 269 270 271 272 273 274 275 276 277 278 279 280 281 282 283 284 285 286 287 288 289 290 291 292 293 294 295 296 297 298 299 300 301 302 303 304 305 306 307 308 309 310 311 312 313 314 315 316 --- apiVersion: apiextensions.k8s.io/v1beta1 kind: CustomResourceDefinition metadata: name: ingressroutes.traefik.containo.us spec: scope: Namespaced group: traefik.containo.us version: v1alpha1 names: kind: IngressRoute plural: ingressroutes singular: ingressroute --- apiVersion: apiextensions.k8s.io/v1beta1 kind: CustomResourceDefinition metadata: name: ingressroutetcps.traefik.containo.us spec: scope: Namespaced group: traefik.containo.us version: v1alpha1 names: kind: IngressRouteTCP plural: ingressroutetcps singular: ingressroutetcp --- apiVersion: apiextensions.k8s.io/v1beta1 kind: CustomResourceDefinition metadata: name: middlewares.traefik.containo.us spec: scope: Namespaced group: traefik.containo.us version: v1alpha1 names: kind: Middleware plural: middlewares singular: middleware --- apiVersion: apiextensions.k8s.io/v1beta1 kind: CustomResourceDefinition metadata: name: tlsoptions.traefik.containo.us spec: scope: Namespaced group: traefik.containo.us version: v1alpha1 names: kind: TLSOption plural: tlsoptions singular: tlsoption --- apiVersion: apiextensions.k8s.io/v1beta1 kind: CustomResourceDefinition metadata: name: traefikservices.traefik.containo.us spec: scope: Namespaced group: traefik.containo.us version: v1alpha1 names: kind: TraefikService plural: traefikservices singular: traefikservice --- apiVersion: apiextensions.k8s.io/v1beta1 kind: CustomResourceDefinition metadata: name: tlsstores.traefik.containo.us spec: group: traefik.containo.us version: v1alpha1 names: kind: TLSStore plural: tlsstores singular: tlsstore scope: Namespaced --- apiVersion: apiextensions.k8s.io/v1beta1 kind: CustomResourceDefinition metadata: name: ingressrouteudps.traefik.containo.us spec: group: traefik.containo.us version: v1alpha1 names: kind: IngressRouteUDP plural: ingressrouteudps singular: ingressrouteudp scope: Namespaced --- apiVersion: v1 kind: ServiceAccount metadata: namespace: kube-system name: traefik-ingress-controller --- kind: ClusterRole apiVersion: rbac.authorization.k8s.io/v1beta1 metadata: name: traefik-ingress-controller rules: - apiGroups: ["" ] resources: ["services" ,"endpoints" ,"secrets" ] verbs: ["get" ,"list" ,"watch" ] - apiGroups: ["extensions" ] resources: ["ingresses" ] verbs: ["get" ,"list" ,"watch" ] - apiGroups: ["extensions" ] resources: ["ingresses/status" ] verbs: ["update" ] - apiGroups: ["traefik.containo.us" ] resources: ["middlewares" ,"ingressroutes" ,"ingressroutetcps" ,"tlsoptions" ,"ingressrouteudps" ,"traefikservices" ,"tlsstores" ] verbs: ["get" ,"list" ,"watch" ] --- kind: ClusterRoleBinding apiVersion: rbac.authorization.k8s.io/v1beta1 metadata: name: traefik-ingress-controller roleRef: apiGroup: rbac.authorization.k8s.io kind: ClusterRole name: traefik-ingress-controller subjects: - kind: ServiceAccount name: traefik-ingress-controller namespace: kube-system --- kind: ConfigMap apiVersion: v1 metadata: name: traefik-config namespace: kube-system data: traefik.yaml: |- ping: "" ## 启用 Ping serversTransport: insecureSkipVerify: true ## Traefik 忽略验证代理服务的 TLS 证书 api: insecure: true ## 允许 HTTP 方式访问 API dashboard: true ## 启用 Dashboard debug: false ## 启用 Debug 调试模式 metrics: prometheus: "" ## 配置 Prometheus 监控指标数据,并使用默认配置 entryPoints: web: address: ":80" ## 配置 80 端口,并设置入口名称为 web websecure: address: ":443" ## 配置 443 端口,并设置入口名称为 websecure scene_seed: #address: "192.168.50.116:8201/udp" # 固定监听8201端口在192.168.50.112这台node上,因业务原因需要 address: ":8201/udp" # seed-game go游戏项目用到,这里先添加了 gate_seed: address: ":8101/tcp" # address: [host]:port[/tcp|/udp] 以这种写法 providers: kubernetesCRD: "" kubernetesIngress: "" log: filePath: "" level: error format: json accessLog: filePath: "" format: json bufferingSize: 0 filters: retryAttempts: true minDuration: 20 fields: defaultMode: keep names: ClientUsername: drop headers: defaultMode: keep names: User-Agent: redact Authorization: drop Content-Type: keep --- apiVersion: v1 kind: Service metadata: name: traefik namespace: kube-system spec: ports: - name: web port: 80 - name: websecure port: 443 - name: admin port: 8080 selector: app: traefik --- apiVersion: apps/v1 kind: DaemonSet metadata: name: traefik-ingress-controller namespace: kube-system labels: app: traefik spec: selector: matchLabels: app: traefik template: metadata: name: traefik labels: app: traefik spec: serviceAccountName: traefik-ingress-controller terminationGracePeriodSeconds: 1 containers: - image: traefik:v2.2.8 name: traefik-ingress-lb ports: - name: web containerPort: 80 hostPort: 80 - name: websecure containerPort: 443 hostPort: 443 - name: admin containerPort: 8080 - containerPort: 8101 hostPort: 8101 name: gate-seed protocol: TCP - containerPort: 8201 hostPort: 8201 name: scene-seed protocol: UDP resources: limits: cpu: 2000m memory: 1024Mi requests: cpu: 1000m memory: 1024Mi securityContext: capabilities: drop: - ALL add: - NET_BIND_SERVICE args: - --configfile=/config/traefik.yaml volumeMounts: - mountPath: "/config" name: "config" readinessProbe: httpGet: path: /ping port: 8080 failureThreshold: 3 initialDelaySeconds: 10 periodSeconds: 10 successThreshold: 1 timeoutSeconds: 5 livenessProbe: httpGet: path: /ping port: 8080 failureThreshold: 3 initialDelaySeconds: 10 periodSeconds: 10 successThreshold: 1 timeoutSeconds: 5 volumes: - name: config configMap: name: traefik-config --- apiVersion: traefik.containo.us/v1alpha1 kind: IngressRoute metadata: name: traefik-dashboard-ingress namespace: kube-system spec: entryPoints: - web routes: - match: Host(`traefik.seed.com`) && PathPrefix(`/`) kind: Rule services: - name: traefik port: 8080
排查故障可能用到的命令
1 2 3 4 5 6 kubectl get ingressRoute/traefik-dashboard-ingress -o wide -n kube-system kubectl describe ingressRoute/traefik-dashboard-ingress -n kube-system kubectl get service/traefik -o yaml -n kube-systeml kubectl get daemonset.apps/traefik-ingress-controller -o yaml -n kube-system kubectl logs --tail =10 pod/traefik-ingress-controller-gcgzs -n kube-system kubectl exec -it pod/traefik-ingress-controller-gcgzs /bin/sh -n kube-system
如果有图形化界面的话,可用直接进入界面,点点点就可以了。更方便些,那么会搭建一套吧。
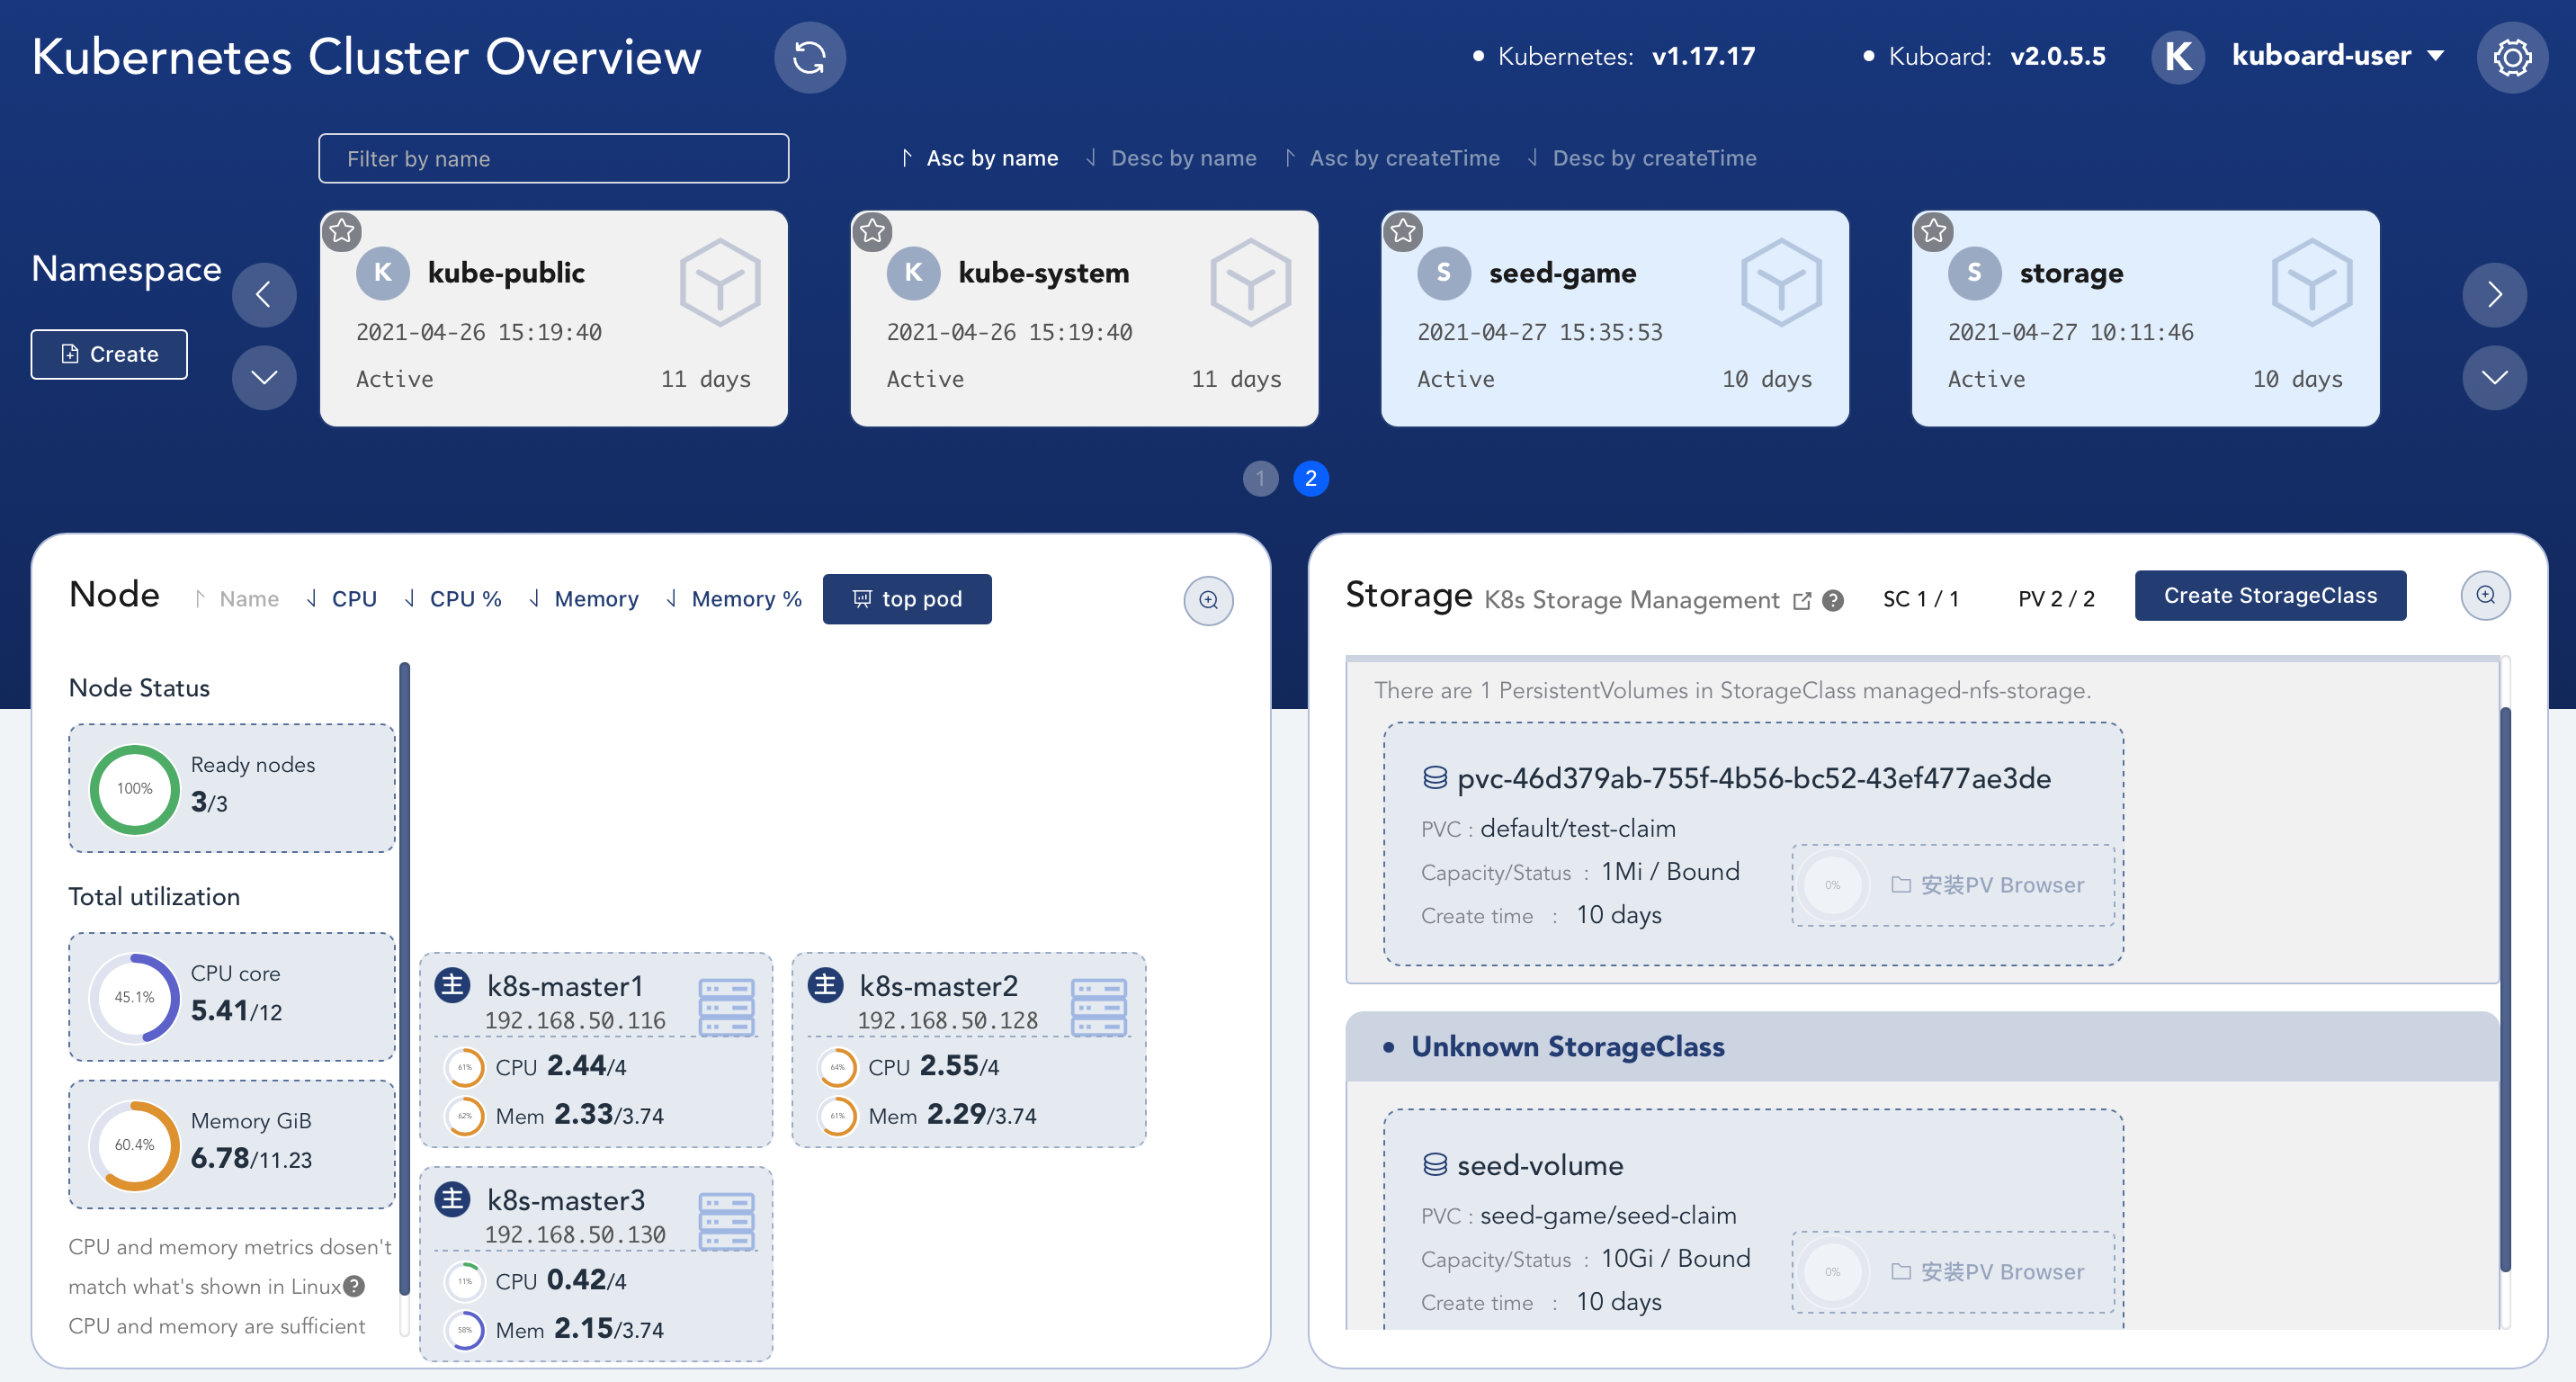
kuboard 图形化界面 国人开发的K8S学习网站哦,各种教程,图形化界面也是他写的。给大佬递茶,膜拜!
参考文档:https://kuboard.cn/
如果需要使用https访问,那么需要创建证书
1 2 openssl req -x509 -nodes -days 365 -newkey rsa:2048 -keyout tls.key -out tls.crt -subj "/CN=kuboard.seed.com" kubectl create secret tls kuboard-tls --cert=tls.crt --key=tls.key -n kube-system
kuboard.yaml
1 2 3 4 5 6 7 8 9 10 11 12 13 14 15 16 17 18 19 20 21 22 23 24 25 26 27 28 29 30 31 32 33 34 35 36 37 38 39 40 41 42 43 44 45 46 47 48 49 50 51 52 53 54 55 56 57 58 59 60 61 62 63 64 65 66 67 68 69 70 71 72 73 74 75 76 77 78 79 80 81 82 83 84 85 86 87 88 89 90 91 92 93 94 95 96 97 98 99 100 101 102 103 104 105 106 107 108 109 apiVersion: apps/v1 kind: Deployment metadata: name: kuboard namespace: kube-system annotations: k8s.kuboard.cn/displayName: kuboard k8s.kuboard.cn/ingress: "true" k8s.kuboard.cn/workload: kuboard labels: k8s.kuboard.cn/layer: monitor k8s.kuboard.cn/name: kuboard spec: replicas: 2 selector: matchLabels: k8s.kuboard.cn/layer: monitor k8s.kuboard.cn/name: kuboard template: metadata: labels: k8s.kuboard.cn/layer: monitor k8s.kuboard.cn/name: kuboard spec: containers: - name: kuboard image: imagePullPolicy: Always tolerations: - key: node-role.kubernetes.io/master effect: NoSchedule operator: Exists --- apiVersion: v1 kind: Service metadata: name: kuboard namespace: kube-system spec: ports: - name: http port: 80 targetPort: 80 selector: k8s.kuboard.cn/layer: monitor k8s.kuboard.cn/name: kuboard --- apiVersion: v1 kind: ServiceAccount metadata: name: kuboard-user namespace: kube-system --- apiVersion: rbac.authorization.k8s.io/v1 kind: ClusterRoleBinding metadata: name: kuboard-user roleRef: apiGroup: rbac.authorization.k8s.io kind: ClusterRole name: cluster-admin subjects: - kind: ServiceAccount name: kuboard-user namespace: kube-system --- apiVersion: v1 kind: ServiceAccount metadata: name: kuboard-viewer namespace: kube-system --- apiVersion: rbac.authorization.k8s.io/v1 kind: ClusterRoleBinding metadata: name: kuboard-viewer roleRef: apiGroup: rbac.authorization.k8s.io kind: ClusterRole name: view subjects: - kind: ServiceAccount name: kuboard-viewer namespace: kube-system --- apiVersion: traefik.containo.us/v1alpha1 kind: IngressRoute metadata: name: kuboard namespace: kube-system spec: entryPoints: - websecure - web routes: - match: Host(`kuboard.seed.com`) && PathPrefix(`/`) kind: Rule services: - name: kuboard port: 80 tls: secretName: kuboard-tls
相关命令
1 2 3 4 5 echo $(kubectl -n kube-system get secret $(kubectl -n kube-system get secret | grep kuboard-user | awk '{print $1}' ) -o go-template='{{.data.token}}' | base64 -d)kubectl describe secret $(kubectl get secrets -n kube-system |awk '/kuboard-user/{print $1}' ) -n kube-system|awk '/token:/{print $2}'
Storage篇 nfs篇 Kubernetes 中支持动态申请PV和PVC的功能,但是nfs存储本身不支持这个功能,但是nfs存储又是非常常用的一种共享存储。NFS-Client Provisioner 使得nfs server具备对外提供动态PV的能力
官方主页: https://github.com/kubernetes-sigs/nfs-subdir-external-provisioner。生成的目录为:`${namespace}-${pvcName}-${pvName}`
nfs 使用之前需要先搭建nfs server
1 2 3 4 5 6 7 8 $ yum install -y nfs-utils $ echo '/data/nfs *(rw,sync,no_wdelay,no_root_squash)' > /etc/exports $ systemctl start nfs $ systemctl enable nfs $ showmount -e Export list for jenkins: /data/nfs * $ mount -t nfs 192.168.50.168:/data/nfs /home/data-nfs
nfs-install.yaml
1 2 3 4 5 6 7 8 9 10 11 12 13 14 15 16 17 18 19 20 21 22 23 24 25 26 27 28 29 30 31 32 33 34 35 36 37 38 39 40 41 42 43 44 45 46 47 48 49 50 51 52 53 54 55 56 57 58 59 60 61 62 63 64 65 66 67 68 69 70 71 72 73 74 75 76 77 78 79 80 81 82 83 84 85 86 87 88 89 90 91 92 93 94 95 96 97 98 99 100 101 102 103 104 105 106 107 108 109 110 111 --- apiVersion: v1 kind: ServiceAccount metadata: name: nfs-client-provisioner namespace: storage --- kind: ClusterRole apiVersion: rbac.authorization.k8s.io/v1 metadata: name: nfs-client-provisioner-runner rules: - apiGroups: ["" ] resources: ["persistentvolumes" ] verbs: ["get" , "list" , "watch" , "create" , "delete" ] - apiGroups: ["" ] resources: ["persistentvolumeclaims" ] verbs: ["get" , "list" , "watch" , "update" ] - apiGroups: ["storage.k8s.io" ] resources: ["storageclasses" ] verbs: ["get" , "list" , "watch" ] - apiGroups: ["" ] resources: ["events" ] verbs: ["create" , "update" , "patch" ] --- kind: ClusterRoleBinding apiVersion: rbac.authorization.k8s.io/v1 metadata: name: run-nfs-client-provisioner subjects: - kind: ServiceAccount name: nfs-client-provisioner namespace: storage roleRef: kind: ClusterRole name: nfs-client-provisioner-runner apiGroup: rbac.authorization.k8s.io --- kind: Role apiVersion: rbac.authorization.k8s.io/v1 metadata: name: leader-locking-nfs-client-provisioner namespace: storage rules: - apiGroups: ["" ] resources: ["endpoints" ] verbs: ["get" , "list" , "watch" , "create" , "update" , "patch" ] --- kind: RoleBinding apiVersion: rbac.authorization.k8s.io/v1 metadata: name: leader-locking-nfs-client-provisioner namespace: storage subjects: - kind: ServiceAccount name: nfs-client-provisioner namespace: storage roleRef: kind: Role name: leader-locking-nfs-client-provisioner apiGroup: rbac.authorization.k8s.io --- apiVersion: apps/v1 kind: Deployment metadata: name: nfs-client-provisioner labels: app: nfs-client-provisioner namespace: storage spec: replicas: 1 strategy: type: Recreate selector: matchLabels: app: nfs-client-provisioner template: metadata: labels: app: nfs-client-provisioner spec: serviceAccountName: nfs-client-provisioner containers: - name: nfs-client-provisioner image: quay.mirrors.ustc.edu.cn/external_storage/nfs-client-provisioner:latest volumeMounts: - name: nfs-client-root mountPath: /persistentvolumes env: - name: PROVISIONER_NAME value: fuseim.pri/ifs - name: NFS_SERVER value: 192.168 .50 .168 - name: NFS_PATH value: /data/nfs volumes: - name: nfs-client-root nfs: server: 192.168 .50 .168 path: /data/nfs
nfs-storageclass.yaml
创建一个 StoageClass,声明 NFS 动态卷提供者名称为 managed-nfs-storage
nfs-storageclass.yaml
1 2 3 4 5 6 7 8 --- apiVersion: storage.k8s.io/v1 kind: StorageClass metadata: name: managed-nfs-storage provisioner: fuseim.pri/ifs parameters: archiveOnDelete: "false"
创建 PVC 和 Pod 进行测试
test-nfs.yaml
1 2 3 4 5 6 7 8 9 10 11 12 13 14 15 16 17 18 19 20 21 22 23 24 25 26 27 28 29 30 31 32 33 34 kind: PersistentVolumeClaim apiVersion: v1 metadata: name: test-pvc spec: storageClassName: managed-nfs-storage accessModes: - ReadWriteOnce resources: requests: storage: 1Mi --- kind: Pod apiVersion: v1 metadata: name: test-pod spec: containers: - name: test-pod image: busybox:latest command: - "/bin/sh" args: - "-c" - "touch /mnt/SUCCESS && exit 0 || exit 1" volumeMounts: - name: nfs-pvc mountPath: "/mnt" restartPolicy: "Never" volumes: - name: nfs-pvc persistentVolumeClaim: claimName: test-pvc
进入NFS Server服务器验证是否创建对应文件
1 2 3 4 5 6 7 $ cd /nfs/data $ ls kube-public-test-pvc-pvc-3dc54156-b81d-11e9-a8b8-000c29d98697 $ cd /kube-public-test-pvc-pvc-3dc54156-b81d-11e9-a8b8-000c29d98697 $ ls SUCCESS
实战!Go项目投入K8S 一般centos环境 启动命令
1 2 3 4 5 6 7 8 9 10 11 12 13 14 15 [program:game-seed_test_o] command = /app/bin/SeedGame_d process_name = %(program_name)s_%(process_num)d numprocs = 1 directory = /app/bin/ autostart = false startsecs = 3 startretries = 3 autorestart = unexpected exitcodes = 0 redirect_stderr = false stdout_logfile_maxbytes = 100MB stderr_logfile = syslog stderr_logfile_maxbytes = 100MB environment = WEB_BOSS_RT_ENV=seed_test_o,WEB_BOSS_GAME_ID=Goblin,WEB_BOSS_SERV_ID=10001,K8S_HOST_IP=192.168.50.115,WEB_BOSS_PF_ID=1
seed.yaml
1 2 3 4 5 6 7 8 9 10 11 12 13 14 15 16 17 18 19 20 21 22 23 24 25 26 27 28 29 30 31 32 33 34 35 36 37 38 39 40 41 42 43 44 45 46 47 48 49 50 51 52 53 54 55 56 57 58 59 60 61 62 63 64 65 66 67 68 69 70 71 72 73 74 75 76 77 78 79 80 81 82 83 84 85 86 87 88 89 90 91 92 93 94 95 96 97 98 99 100 101 102 103 104 kind: Service apiVersion: v1 metadata: name: seed namespace: seed-game labels: app.kubernetes.io/instance: seed app.kubernetes.io/name: seed spec: type: ClusterIP ports: - name: http port: 80 targetPort: 8090 protocol: TCP - name: gateport port: 8101 targetPort: 8101 protocol: TCP - name: clientport port: 8201 targetPort: 8201 protocol: UDP selector: app.kubernetes.io/instance: seed app.kubernetes.io/name: seed --- apiVersion: apps/v1 kind: Deployment metadata: name: seed-game-deploy namespace: seed-game labels: app.kubernetes.io/instance: seed app.kubernetes.io/name: seed app.kubernetes.io/version: v1.0 spec: replicas: 2 strategy: rollingUpdate: maxSurge: 50 % maxUnavailable: 50 % type: RollingUpdate selector: matchLabels: app.kubernetes.io/instance: seed app.kubernetes.io/name: seed template: metadata: labels: app.kubernetes.io/instance: seed app.kubernetes.io/name: seed spec: containers: - env: - name: WEB_BOSS_RT_ENV value: "seed_test_k8s" - name: WEB_BOSS_GAME_ID value: "Goblin" - name: WEB_BOSS_SERV_ID value: "1001" - name: K8S_HOST_IP value: "192.168.50.112" - name: WEB_BOSS_PF_ID value: "1" image: centos:7 imagePullPolicy: IfNotPresent name: seed-game workingDir: /app/bin command: - /app/bin/SeedGame_d ports: - containerPort: 8101 name: gateport protocol: TCP - containerPort: 8090 name: http protocol: TCP - containerPort: 8201 name: clientport protocol: UDP volumeMounts: - mountPath: "/app" name: nfs-pvc - mountPath: "/etc/localtime" name: timezone volumes: - name: nfs-pvc persistentVolumeClaim: claimName: seed-claim - name: timezone hostPath: path: /etc/localtime